A Step-by-Step Guide to Setting Up Environment Variables in Netlify

Photo by Nubelson Fernandes on Unsplash
In my journey of developing a Next.js project using the Unsplash API to recreate the official Unsplash website with all its functionality based on what's available to use from their API and deploying it to Netlify, I encountered an interesting issue that took most of my day to figure out what really is the problem and how to fix it which is related to environment variables. Specifically, I had successfully stored my Unsplash access key in the .env.local file, allowing my code to run flawlessly on my local machine. However, upon deploying the project to Netlify, I faced the frustrating "access key is invalid" error for hours I had to remove some code, comment out codes, and uninstall packages. In this blog post, I will share my experience, discuss the importance of Netlify environment variables, and provide a step-by-step guide to resolve this issue.
Understanding Netlify Environment Variables: Netlify allows developers to configure environment variables, which are essential for securely storing sensitive information like API keys, database credentials, or third-party service tokens. Environment variables in Netlify can be set through the project's settings and are specific to each deployment, ensuring a separation of concerns between development and production environments.
Step-by-Step Guide to Resolving the "Access Key is Invalid" Error:
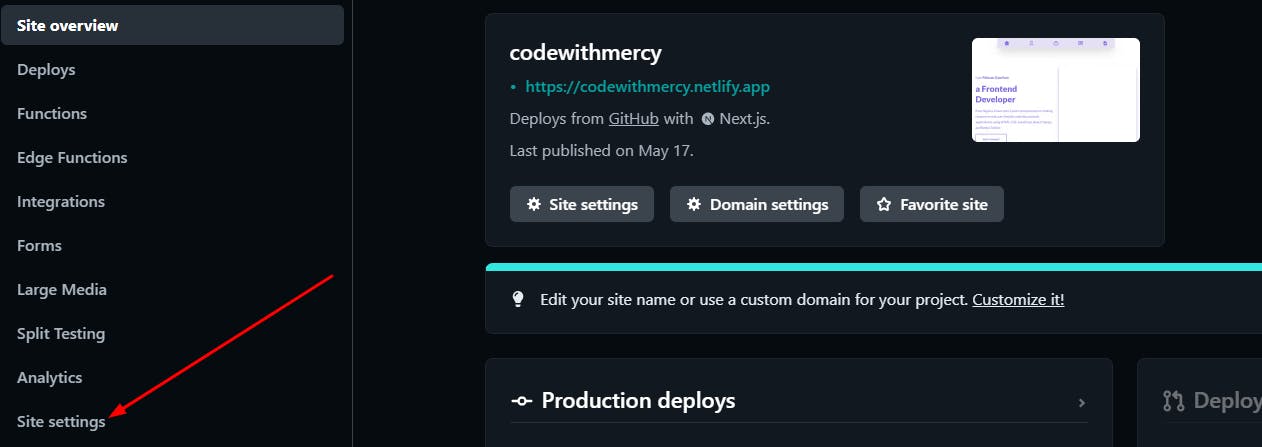
Step 1: Accessing Netlify Project Settings To get started, open your web browser and go to the Netlify website (https://www.netlify.com). Log in to your Netlify account and select your project from the dashboard.

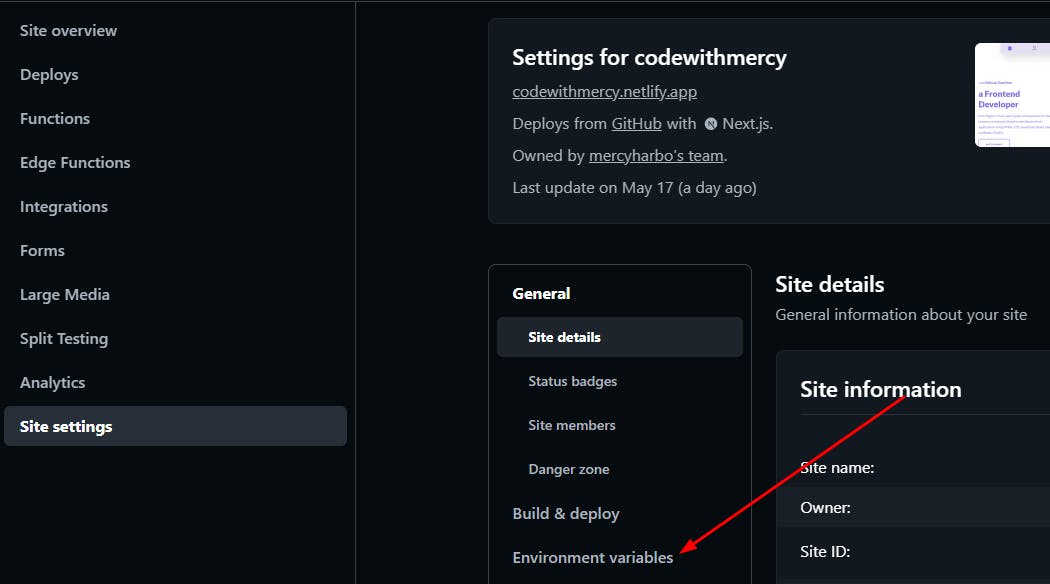
Step 2: Locating Environment Variables Once you're in the project dashboard, look for the "Settings" tab. Click on it to access the project's settings.

Step 3: Adding a New Environment Variable Scroll down to the
Build & Deploysection within the project settings. Under this section, you will find an "Environment" heading. But Netlify already save people that stress by just including Environment Variable under the General options instead of having to go throughBuild & DeployClick on it to proceed.
Step 4: Editing Environment Variables Within the "Environment Variables" section, locate and click on the "Edit variables" button. This will allow you to add or modify the environment variables for your project.

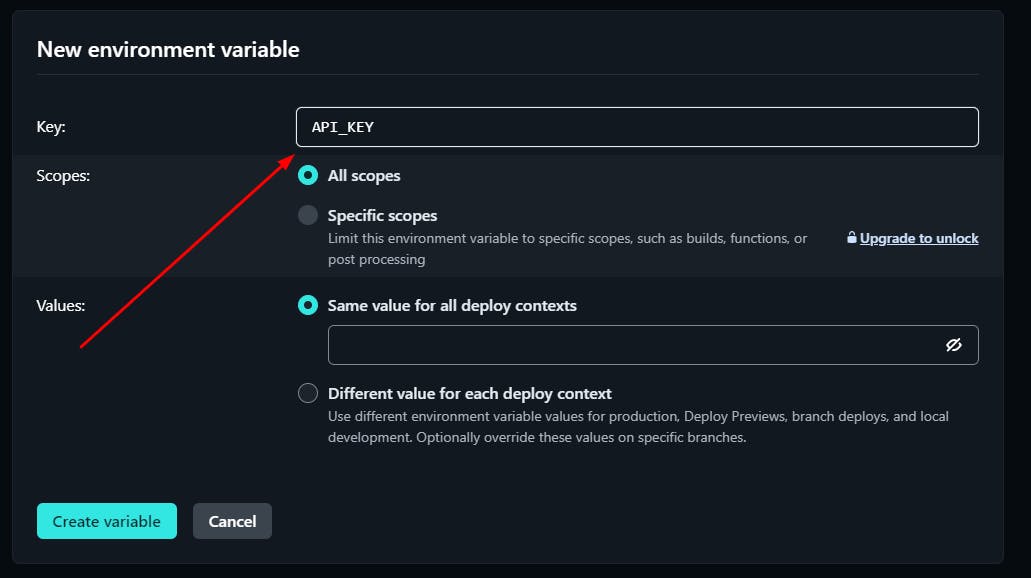
Step 5: Adding the Access Key Variable Click on the "New Variable" button to create a new environment variable. In the input field, type the name of your variable, which in this case can be anything "API_KEY". It's important to use uppercase letters for the variable name.

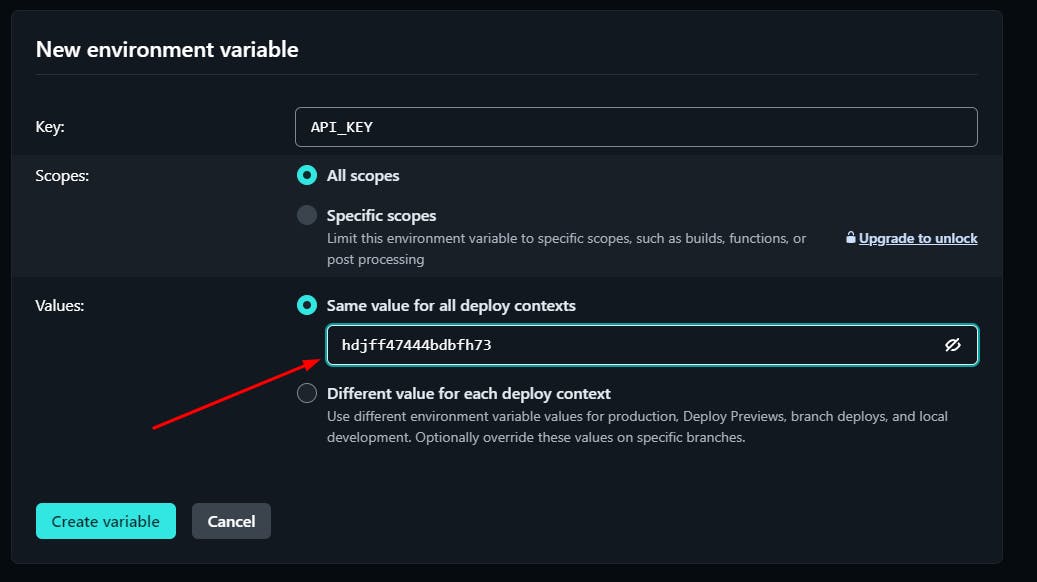
Step 6: Setting the Value In the adjacent input field, enter the value associated with your access OR API key. Double-check that you are entering the correct key without any extra spaces or characters.

Step 7: Saving the Environment Variable Click on the "Create variable" button to save the environment variable. Netlify will automatically trigger a rebuild and deploy your project with the updated environment variable but in my case, the rebuild was not triggered after doing all these, it was when I push a new update to my codebase on GitHub which forces my deployment to rebuild before all my charges were applied but you can be lucky and it will be different for you.
Step 8: Verifying the Deployment After the deployment process is complete, monitor the deploy logs provided by Netlify to ensure that there are no errors related to the access key. Netlify will display the status and progress of the deployment, allowing you to track any issues that might arise.
Conclusion:
In this blog post, I shared my experience with encountering the "access key is invalid" error in my Next.js project while deploying it to Netlify. Through an exploration of Netlify environment variables, I highlighted the significance of securely storing sensitive information and provided a detailed, step-by-step guide to resolve the issue. By following these steps, even a 5-year-old can confidently configure environment variables in Netlify and ensure their applications work seamlessly 😄😄😄. Remember, Netlify provides extensive documentation and resources to assist in the process, so don't hesitate to seek further guidance. Happy coding and deploying!
Additional Resources:
Netlify Environment Variables Documentation: Link Netlify Environment Variables Documentation
Next.js Documentation: [Next.js Documentation](https://nextjs.org/docs/)
You can get on here:
[GitHub](https://github.com/mercyharbo)
[LinkedIn](https://www.linkedin.com/in/codewithmercy)
[Twitter](https://twitter.com/codewithmercy)
